
![]()
GIMP (Gnu Image Manipulation Program) is an open-source image editing program that imitated the basic functions of professional programs like Adobe Photoshop. In this lesson, you will learn about all of the tools offered on your default toolbar. This includes crop, rotate, select and scale! This is the second article in a new How-To series with GIMP. [re-written by Abbi McHenry]
 The toolbar that is offered on GIMP comes with many different options for you to play around with. This time, we will be going over all of your options and showing you how to manage them. First, you want to open up GIMP and open your toolbar. If it is not open, go to (windows>toolbox) and dock it on the side of your screen by holding the tab bar at the top and dragging it to an open spot on your window. There is a lot of tool options, and each option is able to be adjusted to your own discretion.
There are 20 tools will be going over in this article, as the remaining 10 are reserved for a separate article.Your tools can be split up into two different groups: Paint tools and transform tools.
Paint Tools
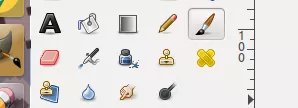 The first section we will go over are the painting tools. The painting tools are used for basic illustration, selection and blending colors together. These tools are the most common tools used in GIMP and will help you with the illustration side of your art.
Text: (letter icon) Add text to your canvas by left clicking when selected.
Brush tools: (paintbrush, pencil and airbrush icon) These consist of your pencil, paintbrush, and your airbrush. Your pencil tool is very crude and pixelated and does not sense pressure. The paintbrush, while not extremely pixelated, is still not as soft as the airbrush. While the airbrush allows more transparent and detailed shading, it is the hardest to manage.
Bucket fill: (bucket icon) This tool allows you to fill in areas with solid color without brushing it in manually. The bucket tool automatically pulls from the foreground color, so if you want to use a different color, make sure to switch it out.
Gradient tool: (gradient box icon) Dragging your mouse while left clicking on your canvas while using this tool will create a gradient using your foreground and background colors. You can create a radial, linear, bilinear, spiral (clockwise), spiral (counterclockwise), shaped (spherical), shaped (dimpled), conical (symmetrical) and conical (asymmetrical) gradients.
Eraser: (eraser icon) This allows you to erase any selected layer. You can change the transparency and the size in the option below.
Ink: (inkbottle icon) This brush imitates the flow of an ink brush. It lets out in an uneven, flowing form, unlike its more rigid sister, the paintbrush. You can change the color, size and transparency and can control the flow of the ink by how slow you move you mouse.
Heal: (band-aid icon) This is mainly used for fixing wrinkles in scanned photos. This tool is used by scanning the surrounding area in the photo and imitating the colors and lighting of the photo to flush out any mistakes. This is a very long and complicated process to explain, so visit here to learn more about this tool.
Clone: (stamp) This allows you to mask any area by cloning a previous part of the image. If you want to clone from the image, you have to give GIMP the image you are cloning from. This is a very long and complicated process and takes a while to learn.
Perspective Clone: (stamp similar to clone) This allows you to clone objects while being able to adjust the angle, depth, and perspective of the object. This allows for more detailed and efficient cloning.
Dodge/Burn: (wheel icon) This tool allows you to switch between lightening or darkening parts of an image. “Dodging” an image will cause selected pixels to lighten, while “burning” an image darkens the affected pixels. When you want to only change lighter, mid tones or darker pixels, you want to select either the ‘shadows’, ‘mid tones’ or ‘highlights’ tab. GIMP will automatically measure the darkness/brightness of the pixels and change them accordingly.
Smudge: (finger icon) The smudge tool will allow you to blend and smudge images to allow a smoother, blended look. Holding ‘shift’ will allow you to smudge in a straight line.
Transform Tools
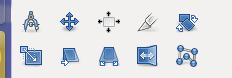 This next section will explain your transformation tools. These tools will mostly assist you in basic photo resizing, rotating, selection, zooming etc. When you use the majority of these tools, you will have separate popup windows.
Measure tool: This tool tells you about the amount of pixels that are in the image you are measuring.
Move tool: This allows you to move any layer when selected, and allows you to move text boxes as well.
Align: This will allow you to move layers to your preference, and gives you the option to align your layers.
Crop tool: This allows you to clip and crop your images. This is very helpful when wanting to readjust your imported image to your canvas size.
Rotate: This allows you to rotate a selected object or layer. This tool’s options is brought up in a separate pop-up window. You can manually adjust it or put in pre-desired coordinates.
Scale: This will allow you to change the height and width of the image, but it will warp your image accordingly. This tool’s options will pop up in a separate pop-up window.
Shear: This is commonly mixed up with scale…. the shear tool changes any rectangle shape to a diamond, and adjusts the pixels accordingly
Flip: This allows you to flip the image horizontally or vertically. This is most commonly used to create a reflection-like look.
Perspective: This allows you to individually move one of the four corners of the selected object or layer. This gives it the perspective look desired by gridding the image.
There you have it! These 20 tools will help you in your image editing and all of your illustration endeavors. If you have any more questions, links from the official GIMP website are provided below for each tool.
Happy editing!
Read more about all of these tools at GIMP.org
Paint Tools
Brushes Bucket Gradient Eraser Ink Heal Clone Perspective Dodge/Burn
Transform Tools
Pingback: Introduction to GIMP | Penn Manor High School 1:1 Resources