To record audio, we use a program called Audio Recorder. This program has already been installed on all of the student laptops.
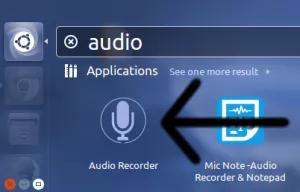
To open Audio Recorder: Search for it in the Dash by typing the word Audio, and click on the Audio Recorder icon.
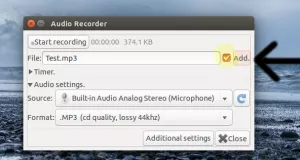
Once the audio recorder window opens make sure you perform the following three steps before you start recording.
1) Select your microphone: Click on Source, then select the microphone that you want to use. The built in microphone is called, “Built-in Audio Analog Stereo (Microphone)“. If you use an external microphone make sure to select it instead.
2) Name your recording: Click on Additional Settings, and delete the contents of the Filename Format text box. Then type the name that you want for your recording. On the screenshot we used the word Test as the name of the recording.
After you have named your recording click on the Ok button.
3) Check the Add checkbox: This will ensure that after you pause your recording and then resume it, all of the audio will be added to the same file. (BE CAREFUL: If this checkbox is left unchecked your current recording will erase and replace the previous one).
Now you are are ready to start recording. Just click the Start Recording button to immediately start recording. When you are finished recording or want to pause it just click the Stop recording button. Click on Start recording again if you want to add on to your recording, and so on.


